6 Describing a profile with python and geni-lib
geni-lib is a tool that allows users to generate RSpec files from Python code. PhantomNet offers the ability to use geni-lib scripts as the definition of a profile, rather then the more primitive RSpec format. When you supply a geni-lib script on the Create Profile page, your script is uploaded to the server so that it can be executed in the geni-lib environment. This allows the script to be verified for correctness, and also produces the equivalent RSpec representation that you can view if you so desire.
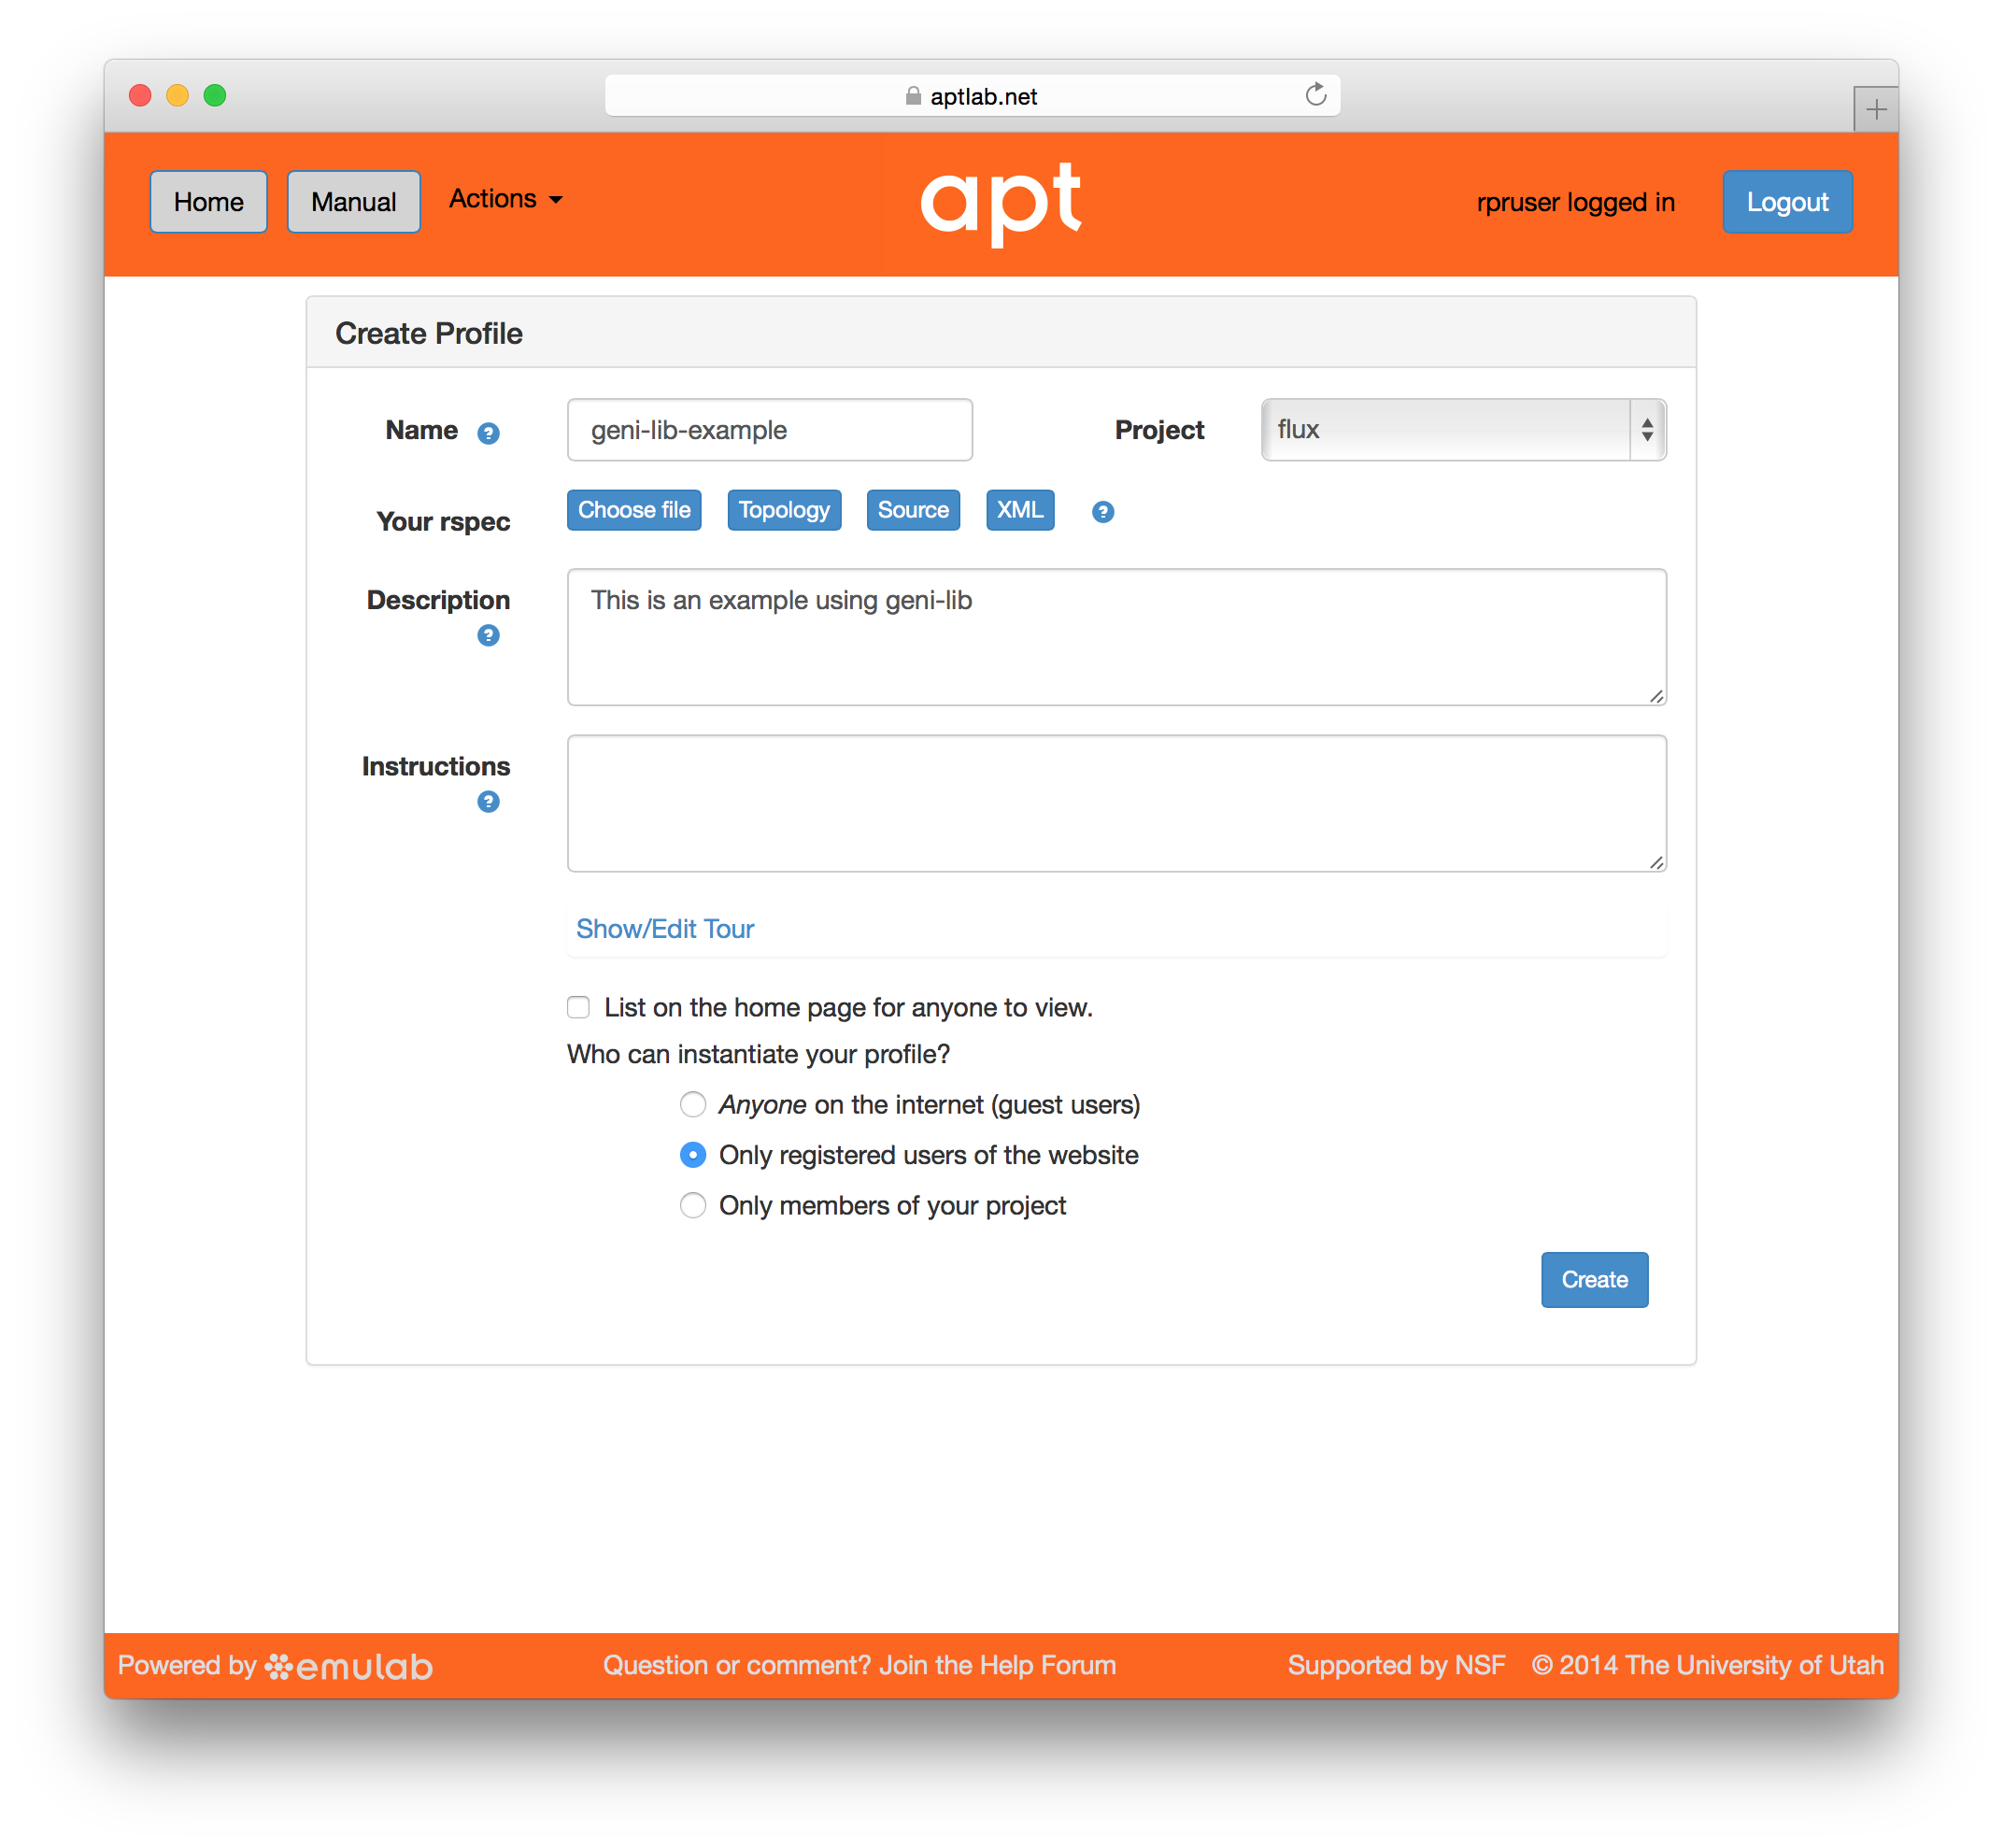
When you provide a geni-lib script, you will see a slightly different set of buttons on the Create Profile page; next to the “Source” button there is an “XML” button that will pop up the RSpec XML for you to look at. The XML is read-only; if you want to change the profile, you will need to change the python source code that is displayed when you click on the “Source” button. Each time you change the python source code, the script is uploaded to the server and processed. Be sure to save your changes if you are updating an existing profile.
The following examples demonstrate basic geni-lib usage. More information about geni-lib and additional examples, can be found in the geni-lib repository. The current version of geni-lib used by PhantomNet can be found in the 0.9-EMULAB branch. Its full documentation is online as part of this manual.
6.1 A single XEN VM node
"""An example of constructing a profile with a single Xen VM. Instructions: Wait for the profile instance to start, and then log in to the VM via the ssh port specified below. (Note that in this case, you will need to access the VM through a high port on the physical host, since we have not requested a public IP address for the VM itself.) """ import geni.portal as portal import geni.rspec.pg as rspec # Create a Request object to start building the RSpec. request = portal.context.makeRequestRSpec() # Create a XenVM node = request.XenVM("node") # Print the RSpec to the enclosing page. portal.context.printRequestRSpec() """An example of constructing a profile with a single Xen VM. Instructions: Wait for the profile instance to start, and then log in to the VM via the ssh port specified below. (Note that in this case, you will need to access the VM through a high port on the physical host, since we have not requested a public IP address for the VM itself.) """ import geni.portal as portal import geni.rspec.pg as rspec # Create a Request object to start building the RSpec. request = portal.context.makeRequestRSpec() # Create a XenVM node = request.XenVM("node") # Print the RSpec to the enclosing page. portal.context.printRequestRSpec()
This example demonstrates the two most important objects: the portal context (accessed through the portal.context object in the geni.portal module), and the request RSpec created by calling makeRequestRSpec() on it. These fundamental objects are central to essentially all PhantomNet geni-lib profiles.
Another way to create a Request RSpec object is to call its constructuor, geni.rspec.pg.Request directly. We ask the Context to create it for us so it it is "bound" to the context and does not need to be explicitly passed to other functions on the context
Once the request object has been created, resources may be added to it by calling methods on it like RawPC() or rspec.pg.LAN. In this example, just a single node (created with the XenVM() constructor, asking for a single VM identified by the name "node") is requested.
Most functions called on Request objects are not directly members of that class. Rather, they are loaded as "extensions" by modules such as geni.rspec.emulab.
The final action the geni-lib script performs is to generate the XML representation of the request RSpec, with the printRequestRSpec() call on the last line. This has the effect of communicating the description of all the resources requested by the profile back to PhantomNet.
You will also notice that the profile begins with a string literal (to be precise, it is a Python docstring). The initial text will also be used as the profile description; the text following the Instructions: line will be used as the corresponding instructions. This documentation is so important that adding the description to the profile is mandatory. (Using a docstring like this is not the only way to produce the description and instructions, although it is the most convenient.)
This simple example has now demonstrated all the important elements of a geni-lib profile. The portal context and request RSpec objects, the final printRequestRSpec() call, and the docstring description and instructions are “boilerplate” constructions, and you will probably include similar or identical versions of them in every geni-lib profile you create unless you are doing something quite unusual.
6.2 A single physical host
"""An example of constructing a profile with a single raw PC. Instructions: Wait for the profile instance to start, and then log in to the host via the ssh port specified below. """ import geni.portal as portal import geni.rspec.pg as rspec # Create a Request object to start building the RSpec. request = portal.context.makeRequestRSpec() # Create a raw PC node = request.RawPC("node") # Print the RSpec to the enclosing page. portal.context.printRequestRSpec() """An example of constructing a profile with a single raw PC. Instructions: Wait for the profile instance to start, and then log in to the host via the ssh port specified below. """ import geni.portal as portal import geni.rspec.pg as rspec # Create a Request object to start building the RSpec. request = portal.context.makeRequestRSpec() # Create a raw PC node = request.RawPC("node") # Print the RSpec to the enclosing page. portal.context.printRequestRSpec()
As mentioned above, most of these simple examples consist of boilerplate geni-lib fragments, and indeed the portal context and request RSpec operations are unchanged from the previous script. The big difference, though (other than the updated documentation) is that in this case the RawPC() method is invoked on the Request object instead of XenVM(). As you might expect, the new profile will request a physical host instead of a virtual one. (A side effect of using a real machine is that it automatically comes with a unique public IP address, where the VM used in the earlier example did not. Profiles can request public IP addresses for VMs too, though it does not happen by default.)
6.3 Two XenVM nodes with a LAN between them
"""An example of constructing a profile with two VMs connected by a LAN. Instructions: Wait for the profile instance to start, and then log in to either VM via the ssh ports specified below. """ import geni.portal as portal import geni.rspec.pg as rspec request = portal.context.makeRequestRSpec() # Create two XenVM nodes. node1 = request.XenVM("node1") node2 = request.XenVM("node2") # Create interfaces for each node. iface1 = node1.addInterface("if1") iface2 = node2.addInterface("if2") # Create a link with the type of LAN. link = request.LAN("lan") # Add both node interfaces to the link. link.addInterface(iface1) link.addInterface(iface2) portal.context.printRequestRSpec() """An example of constructing a profile with two VMs connected by a LAN. Instructions: Wait for the profile instance to start, and then log in to either VM via the ssh ports specified below. """ import geni.portal as portal import geni.rspec.pg as rspec request = portal.context.makeRequestRSpec() # Create two XenVM nodes. node1 = request.XenVM("node1") node2 = request.XenVM("node2") # Create interfaces for each node. iface1 = node1.addInterface("if1") iface2 = node2.addInterface("if2") # Create a link with the type of LAN. link = request.LAN("lan") # Add both node interfaces to the link. link.addInterface(iface1) link.addInterface(iface2) portal.context.printRequestRSpec()
This example demonstrates two important geni-lib concepts: first, adding more than a single node to the request (which is a relatively straightforward matter of calling more than one node object constructor, being careful to use a different name each time). It also shows how to add links between nodes, which is slightly more involved than the nodes themselves, because the network topology must be described in enough detail to be unambiguous.
Note that every node which will be included in a network requires at least one interface. (This is accomplished in the example above with the addInterface() method available on the node object.) Next, the link itself is constructed (see the invocation of pg.LAN), and then both of the previously described interfaces are added to the link with its addInterface() method. Note that the link’s addInterface() and the node’s addInterface() are distinct methods, even though they share the same name! They are also both strictly necessary to describe the topology: although it might seem redundant to add the same interfaces in more than one place in this case, observe that in a more complicated profile containing more than one network, establishing the correct correspondence between interfaces and links would become critical.
6.4 Two ARM64 servers in a LAN
"""An example of constructing a profile with two ARM64 nodes connected by a LAN. Instructions: Wait for the profile instance to start, and then log in to either host via the ssh ports specified below. """ import geni.portal as portal import geni.rspec.pg as rspec request = portal.context.makeRequestRSpec() # Create two raw "PC" nodes node1 = request.RawPC("node1") node2 = request.RawPC("node2") # Set each of the two to specifically request "m400" nodes, which in CloudLab, are ARM node1.hardware_type = "m400" node2.hardware_type = "m400" # Create interfaces for each node. iface1 = node1.addInterface("if1") iface2 = node2.addInterface("if2") # Create a link with type LAN. link = request.LAN("lan") # Add both node interfaces to the link. link.addInterface(iface1) link.addInterface(iface2) portal.context.printRequestRSpec() """An example of constructing a profile with two ARM64 nodes connected by a LAN. Instructions: Wait for the profile instance to start, and then log in to either host via the ssh ports specified below. """ import geni.portal as portal import geni.rspec.pg as rspec request = portal.context.makeRequestRSpec() # Create two raw "PC" nodes node1 = request.RawPC("node1") node2 = request.RawPC("node2") # Set each of the two to specifically request "m400" nodes, which in CloudLab, are ARM node1.hardware_type = "m400" node2.hardware_type = "m400" # Create interfaces for each node. iface1 = node1.addInterface("if1") iface2 = node2.addInterface("if2") # Create a link with type LAN. link = request.LAN("lan") # Add both node interfaces to the link. link.addInterface(iface1) link.addInterface(iface2) portal.context.printRequestRSpec()
We now come to demonstrate requesting particular properties of nodes—
6.5 A VM with a custom size
"""An example of constructing a profile with a single Xen VM. Instructions: Wait for the profile instance to start, and then log in to the VM via the ssh port specified below. (Note that in this case, you will need to access the VM through a high port on the physical host, since we have not requested a public IP address for the VM itself.) """ import geni.portal as portal import geni.rspec.pg as rspec # Create a Request object to start building the RSpec. request = portal.context.makeRequestRSpec() # Create a XenVM node = request.XenVM("node") # Ask for two cores node.cores = 2 # Ask for 2GB of ram node.ram = 2048 # Add an extra 8GB virtual disk. node.disk = 8 # Print the RSpec to the enclosing page. portal.context.printRequestRSpec() """An example of constructing a profile with a single Xen VM. Instructions: Wait for the profile instance to start, and then log in to the VM via the ssh port specified below. (Note that in this case, you will need to access the VM through a high port on the physical host, since we have not requested a public IP address for the VM itself.) """ import geni.portal as portal import geni.rspec.pg as rspec # Create a Request object to start building the RSpec. request = portal.context.makeRequestRSpec() # Create a XenVM node = request.XenVM("node") # Ask for two cores node.cores = 2 # Ask for 2GB of ram node.ram = 2048 # Add an extra 8GB virtual disk. node.disk = 8 # Print the RSpec to the enclosing page. portal.context.printRequestRSpec()
The earlier examples requesting VMs used the default number of cores, quantity of RAM, and disk size. It’s also possible to customize these value, as this example does by setting the cores, ram, and disk properties of the XenVM class (which is a subclass of rspec.pg.Node.)
6.6 Set a specific IP address on each node
"""An example of constructing a profile with node IP addresses specified manually. Instructions: Wait for the profile instance to start, and then log in to either VM via the ssh ports specified below. (Note that even though the EXPERIMENTAL data plane interfaces will use the addresses given in the profile, you will still connect over the control plane interfaces using addresses given by the testbed. The data plane addresses are for intra-experiment communication only.) """ import geni.portal as portal import geni.rspec.pg as rspec request = portal.context.makeRequestRSpec() node1 = request.XenVM("node1") iface1 = node1.addInterface("if1") # Specify the component id and the IPv4 address iface1.component_id = "eth1" iface1.addAddress(rspec.IPv4Address("192.168.1.1", "255.255.255.0")) node2 = request.XenVM("node2") iface2 = node2.addInterface("if2") # Specify the component id and the IPv4 address iface2.component_id = "eth2" iface2.addAddress(rspec.IPv4Address("192.168.1.2", "255.255.255.0")) link = request.LAN("lan") link.addInterface(iface1) link.addInterface(iface2) portal.context.printRequestRSpec() """An example of constructing a profile with node IP addresses specified manually. Instructions: Wait for the profile instance to start, and then log in to either VM via the ssh ports specified below. (Note that even though the EXPERIMENTAL data plane interfaces will use the addresses given in the profile, you will still connect over the control plane interfaces using addresses given by the testbed. The data plane addresses are for intra-experiment communication only.) """ import geni.portal as portal import geni.rspec.pg as rspec request = portal.context.makeRequestRSpec() node1 = request.XenVM("node1") iface1 = node1.addInterface("if1") # Specify the component id and the IPv4 address iface1.component_id = "eth1" iface1.addAddress(rspec.IPv4Address("192.168.1.1", "255.255.255.0")) node2 = request.XenVM("node2") iface2 = node2.addInterface("if2") # Specify the component id and the IPv4 address iface2.component_id = "eth2" iface2.addAddress(rspec.IPv4Address("192.168.1.2", "255.255.255.0")) link = request.LAN("lan") link.addInterface(iface1) link.addInterface(iface2) portal.context.printRequestRSpec()
Some of the available qualifiers on requested nodes are specified by manipulating attributes within the node (or interface) object directly. The hardware_type in the previous example is one such case, as is the component_id here. (Note that the component_id in this example is applied to an interface, although it is also possible to specify component_ids on nodes, too, to request a particular physical host.)
Other modifications to requests require dedicated methods. For instance, see the addAddress() calls made on each of the two interfaces above. In each case, an IPv4Address object is obtained from the appropriate constructor (the parameters are the address and the netmask, respectively), and then added to the corresponding interface.
6.7 OpenEPC extensions
geni-lib includes convenience functions to assist constructing profiles including OpenEPC core networks. Although it is possible to instantiate OpenEPC using geni-lib primitives only, the geni.rspec.emulab.pnext" module hides some of the OpenEPC details, and allows more concise profile scripts. An example of a profile using geni.rspec.emulab.pnext is given below.
#!/usr/bin/python """ An example of a minimal OpenEPC profile. Instructions: Five nodes will be instantiated by this profile: three packet core nodes, and two emulated RAN nodes (one eNodeB and one UE). Please refer to the OpenEPC documentation for instructions on how to operate OpenEPC. """ # Import the standard RSpec and portal modules import geni.portal as portal import geni.rspec.pg as rspec # Import phantoment-specific functionality import geni.rspec.emulab.pnext as pn request = portal.context.makeRequestRSpec() # Create OpenEPC nodes; nodes made with this helper function must # be explicitly added to request after creating them epcen = pn.mkepcnode( "epc", pn.EPCROLES.ENABLERS ) request.addResource( epcen ) pgw = pn.mkepcnode( "pgw", pn.EPCROLES.PGW ) request.addResource( pgw ) sgw = pn.mkepcnode( "sgw", pn.EPCROLES.SGW_MME_SGSN ) request.addResource( sgw ) enodeb = pn.mkepcnode( "enodeb", pn.EPCROLES.ENODEB ) request.addResource( enodeb ) ue = pn.mkepcnode( "ue", pn.EPCROLES.CLIENT ) request.addResource( ue ) # Create LANs: mgmt = request.EPClan( pn.EPCLANS.MGMT ) net_a = request.EPClan( pn.EPCLANS.NET_A ) net_b = request.EPClan( pn.EPCLANS.NET_B ) net_d = request.EPClan( pn.EPCLANS.NET_D ) an_lte = request.EPClan( pn.EPCLANS.AN_LTE ) # Add nodes to appropriate LANs: mgmt.addMember( epcen ) mgmt.addMember( pgw ) mgmt.addMember( sgw ) mgmt.addMember( enodeb ) mgmt.addMember( ue ) net_a.addMember( epcen ) net_a.addMember( pgw ) net_b.addMember( pgw ) net_b.addMember( sgw ) net_d.addMember( sgw ) net_d.addMember( enodeb ) an_lte.addMember( enodeb ) an_lte.addMember( ue ) portal.context.printRequestRSpec() #!/usr/bin/python """ An example of a minimal OpenEPC profile. Instructions: Five nodes will be instantiated by this profile: three packet core nodes, and two emulated RAN nodes (one eNodeB and one UE). Please refer to the OpenEPC documentation for instructions on how to operate OpenEPC. """ # Import the standard RSpec and portal modules import geni.portal as portal import geni.rspec.pg as rspec # Import phantoment-specific functionality import geni.rspec.emulab.pnext as pn request = portal.context.makeRequestRSpec() # Create OpenEPC nodes; nodes made with this helper function must # be explicitly added to request after creating them epcen = pn.mkepcnode( "epc", pn.EPCROLES.ENABLERS ) request.addResource( epcen ) pgw = pn.mkepcnode( "pgw", pn.EPCROLES.PGW ) request.addResource( pgw ) sgw = pn.mkepcnode( "sgw", pn.EPCROLES.SGW_MME_SGSN ) request.addResource( sgw ) enodeb = pn.mkepcnode( "enodeb", pn.EPCROLES.ENODEB ) request.addResource( enodeb ) ue = pn.mkepcnode( "ue", pn.EPCROLES.CLIENT ) request.addResource( ue ) # Create LANs: mgmt = request.EPClan( pn.EPCLANS.MGMT ) net_a = request.EPClan( pn.EPCLANS.NET_A ) net_b = request.EPClan( pn.EPCLANS.NET_B ) net_d = request.EPClan( pn.EPCLANS.NET_D ) an_lte = request.EPClan( pn.EPCLANS.AN_LTE ) # Add nodes to appropriate LANs: mgmt.addMember( epcen ) mgmt.addMember( pgw ) mgmt.addMember( sgw ) mgmt.addMember( enodeb ) mgmt.addMember( ue ) net_a.addMember( epcen ) net_a.addMember( pgw ) net_b.addMember( pgw ) net_b.addMember( sgw ) net_d.addMember( sgw ) net_d.addMember( enodeb ) an_lte.addMember( enodeb ) an_lte.addMember( ue ) portal.context.printRequestRSpec()
While the geni.portal and geni.rspec.pg modules will seem familiar from their use in general geni-lib profiles, the pnext module is new, and provides two main classes: EPCNode and EPClan. These convenience classes provide facilities for adding OpenEPC nodes and networks, respectively. Both classes are also added as extensions to Request, so that (assuming rspec is a valid Request object) a simple call like mgmt = rspec.EPClan( PN.EPCLANS.MGMT ) will both create a LAN and add it to the request.
For the EPCNode class only, a factory method mkepcnode is also defined. (The advantage of using the factory method instead of invoking the EPCNode constructor directly is that it allows specifying default hardware types and disk images to be used by all EPC nodes in the profile. By default, mkepcnode will use a binary OpenEPC disk image.)
The mkepcnode call has two mandatory parameters: the node identifier (just as seen in previous generic geni-lib examples), and a new role, specific to OpenEPC nodes. The role must be chosen from the following, each defined within geni.rspec.pnext.EPCROLES:
ENABLERS |
PGW |
SGW_MME_SGSN |
CLIENT |
ENODEB |
Please consult the OpenEPC documentation for details about specific OpenEPC nodes.
Once nodes are assigned, they should be connected with appropriate core network links. This is the job of the EPClan class, and each LAN should be created by invoking the EPClan constructor with a single mandatory parameter chosen from the following list of network identifiers:
MGMT |
NET_A |
NET_B |
NET_C |
NET_D |
AN_LTE |
The OpenEPC Tutorial gives an overview of the purpose and topology of each network. Once the LAN has been created, its addMember method may be invoked to describe the nodes it should connect.
6.8 RF communication
PhantomNet provides facilities for radio frequency links well suited for wireless protocols, and geni-lib support is provided for requesting them in the form of the pnext module RFLink class. RFLink behaves much like standard LANs, except that all connections are made point-to-point (and so any RFLink must connect exactly two interfaces).
#!/usr/bin/python """ An example of a profile including RF links. Instructions: This is an example profile to demonstrate the description of RF links. It is not particularly useful to instantiate directly. """ import geni.portal as portal import geni.rspec.pg as rspec import geni.rspec.emulab.pnext as pn request = portal.context.makeRequestRSpec() node0 = request.RawPC( "node0" ) iface0 = node0.addInterface( "rf0" ) node1 = request.RawPC( "node1" ) iface1 = node1.addInterface( "rf1" ) rflink = request.RFLink( "rflink" ) rflink.addInterface( iface0 ) rflink.addInterface( iface1 ) portal.context.printRequestRSpec() #!/usr/bin/python """ An example of a profile including RF links. Instructions: This is an example profile to demonstrate the description of RF links. It is not particularly useful to instantiate directly. """ import geni.portal as portal import geni.rspec.pg as rspec import geni.rspec.emulab.pnext as pn request = portal.context.makeRequestRSpec() node0 = request.RawPC( "node0" ) iface0 = node0.addInterface( "rf0" ) node1 = request.RawPC( "node1" ) iface1 = node1.addInterface( "rf1" ) rflink = request.RFLink( "rflink" ) rflink.addInterface( iface0 ) rflink.addInterface( iface1 ) portal.context.printRequestRSpec()
6.9 Specify an operating system and set install and execute scripts
"""An example of constructing a profile with install and execute services. manually. Instructions: Wait for the profile instance to start, and then log in to the VM via the ssh port specified below. The install and execute services are handled automatically during profile instantiation, with no manual intervention required. """ import geni.portal as portal import geni.rspec.pg as rspec request = portal.context.makeRequestRSpec() node1 = request.XenVM("node1") # Specify the URL for the disk image node1.disk_image = "<URL to disk image>" # Install and execute scripts on the VM node1.addService(rspec.Install(url="http://example.org/sample.tar.gz", path="/local")) node1.addService(rspec.Execute(shell="bash", command="/local/example.sh")) pc.printRequestRSpec() """An example of constructing a profile with install and execute services. manually. Instructions: Wait for the profile instance to start, and then log in to the VM via the ssh port specified below. The install and execute services are handled automatically during profile instantiation, with no manual intervention required. """ import geni.portal as portal import geni.rspec.pg as rspec request = portal.context.makeRequestRSpec() node1 = request.XenVM("node1") # Specify the URL for the disk image node1.disk_image = "<URL to disk image>" # Install and execute scripts on the VM node1.addService(rspec.Install(url="http://example.org/sample.tar.gz", path="/local")) node1.addService(rspec.Execute(shell="bash", command="/local/example.sh")) pc.printRequestRSpec()
This example demonstrates how to request services for a node, where PhantomNet will automate some task as part of the profile instance setup procedure. In this case, two services are described (an install and an execute). This is a very common pair of services to request together: the Install object describes a service which retrieves a tarball from the location given in the url parameter, and installs it into the local filesystem as specified by path. (The installation occurs during node setup, upon the first boot after the disk image has been loaded.) The second service, described by the Execute object, invokes a shell process to run the given command. In this example (as is common), the command refers directly to a file saved by the immediately preceding Install service. This behaviour works, because PhantomNet guarantees that all Install services complete before any Execute services are started.
6.10 Profiles with user-specified parameters
"""An example of using parameters to construct a profile with a variable number of nodes. Instructions: Wait for the profile instance to start, and then log in to one or more of the VMs via the ssh port(s) specified below. """ # Import the Portal object. import geni.portal as portal # Import the ProtoGENI library. import geni.rspec.pg as rspec # Describe the parameter(s) this profile script can accept. portal.context.defineParameter( "n", "Number of VMs", portal.ParameterType.INTEGER, 1 ) # Retrieve the values the user specifies during instantiation. params = portal.context.bindParameters() # Create a Request object to start building the RSpec. request = portal.context.makeRequestRSpec() # Check parameter validity. if params.n < 1 or params.n > 8: portal.context.reportError( portal.ParameterError( "You must choose at least 1 and no more than 8 VMs." ) ) for i in range( params.n ): # Create a XenVM and add it to the RSpec. node = request.XenVM( "node" + str( i ) ) # Print the RSpec to the enclosing page. portal.context.printRequestRSpec() """An example of using parameters to construct a profile with a variable number of nodes. Instructions: Wait for the profile instance to start, and then log in to one or more of the VMs via the ssh port(s) specified below. """ # Import the Portal object. import geni.portal as portal # Import the ProtoGENI library. import geni.rspec.pg as rspec # Describe the parameter(s) this profile script can accept. portal.context.defineParameter( "n", "Number of VMs", portal.ParameterType.INTEGER, 1 ) # Retrieve the values the user specifies during instantiation. params = portal.context.bindParameters() # Create a Request object to start building the RSpec. request = portal.context.makeRequestRSpec() # Check parameter validity. if params.n < 1 or params.n > 8: portal.context.reportError( portal.ParameterError( "You must choose at least 1 and no more than 8 VMs." ) ) for i in range( params.n ): # Create a XenVM and add it to the RSpec. node = request.XenVM( "node" + str( i ) ) # Print the RSpec to the enclosing page. portal.context.printRequestRSpec()
Until now, all of the geni-lib scripts have described profiles which could also have been generated with the Jacks GUI, or even by writing a raw XML RSpec directly. However, geni-lib profiles offer an important feature unavailable by the other methods: the ability to describe not a static request, but a request “template” which is dynamically constructed based on a user’s choices at the time the profile is instantiated. The mechanism for constructing such profiles relies on profile parameters; the geni-lib script describes the set of parameters it will accept, and then retrieves the corresponding values at instantiation time and is free to respond by constructing arbitrarily different resource requests based on that input.
The profile above accepts exactly one parameter—
| Simple integer | |
| Arbitrary (uninterpreted) string | |
| True or False | |
| URN to a disk image | |
| URN of a GENI Aggregate Manager | |
| String specifying a type of node | |
| Floating-point number specifying bandwidth in kbps | |
| Floating-point number specifying delay in ms | |
| Integer used for memory or disk size (e.g., MB, GB, etc.) |
The last field is the default value of the parameter, and is required: not only must the field itself contain a valid value, but the set of all parameters must be valid when each of them assumes the default value. (This is partly so that the portal can construct a default topology for the profile without any manual intervention, and partly so that unprivileged users, who may lack permission to supply their own values, might still be able to instantiate the profile.)
After all parameters have been defined, the profile script may retrieve the runtime values with the bindParameters() method. This will return a Python class instance with one attribute for each parameter (with the name supplied during the appropriate defineParameter() call). In the example, the instance was assigned to params, and therefore the only parameter (which was called "n") is accessible as params.n.
Of course, it may be possible for the user to specify nonsensical values for a parameter, or perhaps give a set of parameters whose combination is invalid. A profile should detect error cases like these, and respond by constructing a portal.ParameterError object, which can be passed to the portal context’s reportError() method to abort generation of the RSpec.
6.11 Add temporary local disk space to a node
"""This profile demonstrates how to add some extra *local* disk space on your node. In general nodes have much more disk space then what you see with ‘df‘ when you log in. That extra space is in unallocated partitions or additional disk drives. An *ephemeral blockstore* is how you ask for some of that space to be allocated and mounted as a **temporary** filesystem (temporary means it will be lost when you terminate your experiment). Instructions: Log into your node, your **temporary** file system in mounted at ‘/mydata‘. """ # Import the Portal object. import geni.portal as portal # Import the ProtoGENI library. import geni.rspec.pg as rspec # Import the emulab extensions library. import geni.rspec.emulab # Create a portal context. pc = portal.Context() # Create a Request object to start building the RSpec. request = pc.makeRequestRSpec() # Allocate a node and ask for a 30GB file system mounted at /mydata node = request.RawPC("node") bs = node.Blockstore("bs", "/mydata") bs.size = "30GB" # Print the RSpec to the enclosing page. pc.printRequestRSpec() """This profile demonstrates how to add some extra *local* disk space on your node. In general nodes have much more disk space then what you see with ‘df‘ when you log in. That extra space is in unallocated partitions or additional disk drives. An *ephemeral blockstore* is how you ask for some of that space to be allocated and mounted as a **temporary** filesystem (temporary means it will be lost when you terminate your experiment). Instructions: Log into your node, your **temporary** file system in mounted at ‘/mydata‘. """ # Import the Portal object. import geni.portal as portal # Import the ProtoGENI library. import geni.rspec.pg as rspec # Import the emulab extensions library. import geni.rspec.emulab # Create a portal context. pc = portal.Context() # Create a Request object to start building the RSpec. request = pc.makeRequestRSpec() # Allocate a node and ask for a 30GB file system mounted at /mydata node = request.RawPC("node") bs = node.Blockstore("bs", "/mydata") bs.size = "30GB" # Print the RSpec to the enclosing page. pc.printRequestRSpec()
This example demonstrates how to request extra temporary diskspace on a node. The extra disk space is allocated from unused disk partitions, and is mounted at a directory of your choosing. In the example code above, we are asking for a 30GB file system mounted at "/mydata". Anything you store in this file system is temporary, and will be lost when your experiment is terminated.
The total size of the file systems you can ask for on a node, is obviously limited to the amount of unused disk space available. The system does its best to find nodes with enough space to fulfill the request, but in general you are limited to temporary file systems in the 10s of, or a few hundred GB.
6.12 Creating a reusable dataset
"""This profile demonstrates how to mount a copy of a dataset in a file system. You can make changes to the dataset, but they are *temporary** (temporary means any changes will be lost when you terminate your experiment). You must explicitly request that the changes be saved if you want them to persist. Instructions: Log into your node, your dataset is mounted at ‘/mydata‘. """ # Import the Portal object. import geni.portal as portal # Import the ProtoGENI library. import geni.rspec.pg as rspec # Import the emulab extensions library. import geni.rspec.emulab # Create a portal context. pc = portal.Context() # Create a Request object to start building the RSpec. request = pc.makeRequestRSpec() # Allocate a node and ask for a copy of a dataset to be mounted at /mydata node = request.RawPC("node") bs = node.Blockstore("bs", "/mydata") # A demonstration dataset, there is nothing in the file system. bs.dataset = "urn:publicid:IDN+emulab.net:testbed+imdataset+pgimdat" # Print the RSpec to the enclosing page. pc.printRequestRSpec() """This profile demonstrates how to mount a copy of a dataset in a file system. You can make changes to the dataset, but they are *temporary** (temporary means any changes will be lost when you terminate your experiment). You must explicitly request that the changes be saved if you want them to persist. Instructions: Log into your node, your dataset is mounted at ‘/mydata‘. """ # Import the Portal object. import geni.portal as portal # Import the ProtoGENI library. import geni.rspec.pg as rspec # Import the emulab extensions library. import geni.rspec.emulab # Create a portal context. pc = portal.Context() # Create a Request object to start building the RSpec. request = pc.makeRequestRSpec() # Allocate a node and ask for a copy of a dataset to be mounted at /mydata node = request.RawPC("node") bs = node.Blockstore("bs", "/mydata") # A demonstration dataset, there is nothing in the file system. bs.dataset = "urn:publicid:IDN+emulab.net:testbed+imdataset+pgimdat" # Print the RSpec to the enclosing page. pc.printRequestRSpec()
In this example, we demonstrate how to create and use a dataset. A dataset is simply a snapshot of a temporary file system (see the previous example) that has been saved to permanent storage, and reloaded on a node (or nodes) in a different experiment. This type of dataset must be explicitly saved (more on this below) in order to make changes permanent (and available later). In the example code above, the temporary file system will be loaded with the dataset specified by the URN.
But before you can use a dataset, you first have to create one using the following steps:
- Create an experimentCreate an experiment using the local diskspace example above.
- Add your dataPopulate the file system mounted at /mydata with the data you wish to use in other experiments.
- Fill out the Create Dataset formClick on the "Create Dataset" option in the Actions menu. This will bring up the form to create a new dataset. Choose a name for your dataset and optionally the project the dataset should be associated with. Be sure to select Image Backed for the type. Then choose the the experiment, which node in the experiment, and which blockstore on the node.
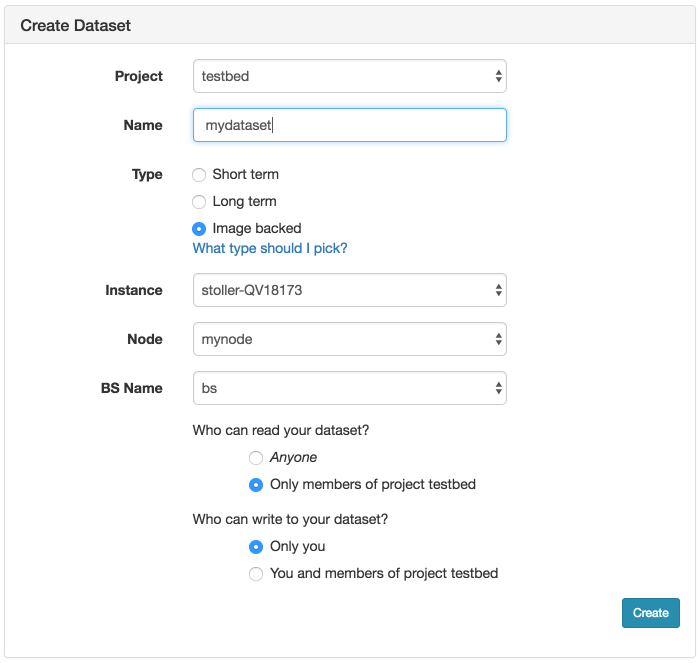
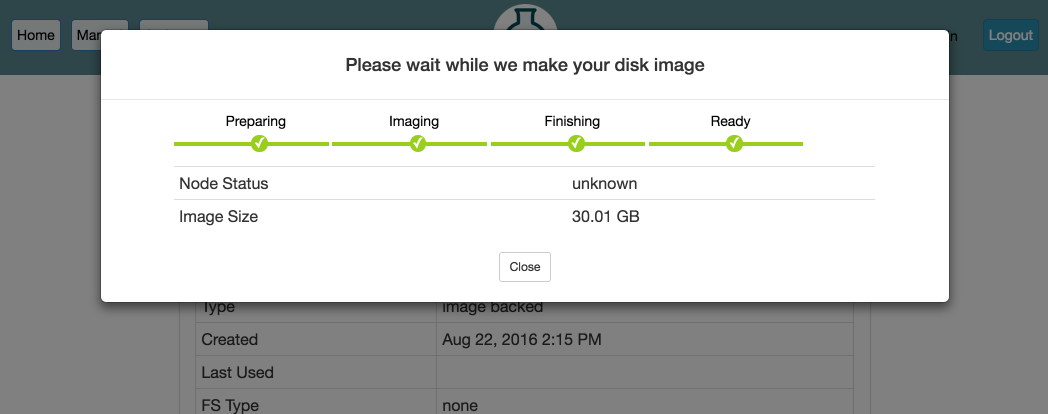
- Click “CreateWhen you click the “Create” button, the file system on your node will be unmounted so that we can take a consistent snapshot of the contents. This process can take several minutes or longer, depending on the size of the file system. You can watch the progress on this page. When the progress bar reaches the “Ready” stage, your new dataset is ready! It will now show up in your “List Datasets” list, and can be used in new experiments.
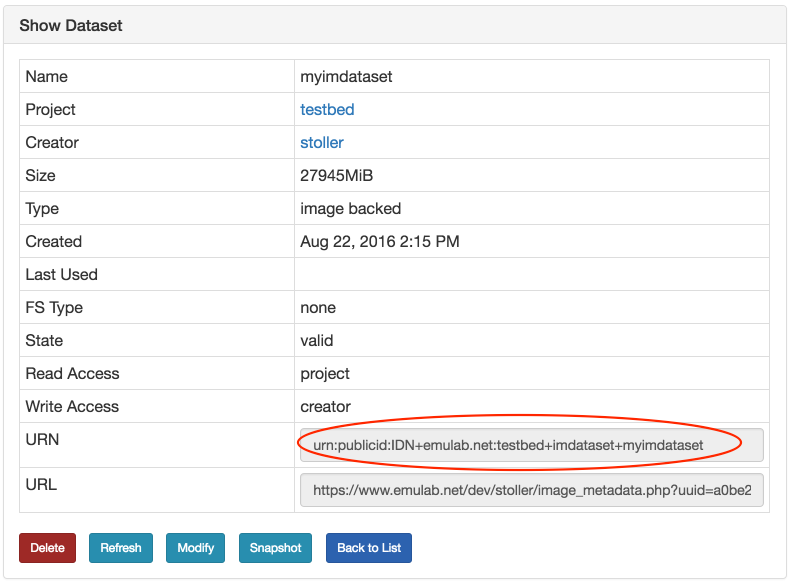
- Use your datasetTo use your new dataset, you will need to reference it in your geni lib script (see the example code above). The name of your dataset is a URN, and can be found on the information page for the dataset. From the Actions menu, click on "List Datasets", find the name of your dataset in the list, and click on it.
- Update your datasetIf you need to make changes to your dataset, simply start an experiment that uses your dataset. Make the changes you need to the file system mounted at /mydata, and then use the "Modify" button as shown in the previous step.
6.13 Debugging geni-lib profile scripts
It is not necessary to instantiate the profile via the portal web interface
to test it. Properly written profile scripts should work perfectly well
independent of the normal portal—
python geni-lib-parameters.py
will produce an RSpec containing three nodes (the default value for n). It is also possible to override the defaults on the command line by giving the parameter name as an option, followed by the desired value:
python geni-lib-parameters.py –n 4
The option –help will list the available parameters and their descriptions.